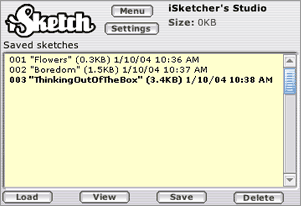
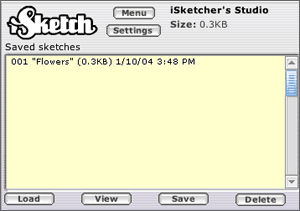
The Studio

The iSketch studio is where where you can practice drawing or create your works of art to save in your computer and/or share with friends who are logged on to iSketch.

Quickstart

  1. Draw a picture.
  2. Click on the SAVE button. The text "/FILE SAVE" will appear on the text input box. Add a one-word title for your sketch.
  3. Press the RETURN key. The saved file will be displayed on the top left window.


Before using most of the Studio commands, you must select a file from your list of saved sketches. On the example to the right, the selected file in iSketcher's Studio is saved sketch 003 entitled "ThinkingOutOfTheBox" with a filesize of 3.4KB along with the time it was saved.

Displaying a sketch sent to you

  1. The server will notify you that a player wants to send a sketch. You can type /VIEW to see the sketch from anywhere on iSketch.
  2. If you are playing a game and someone sends a file, you might want to type /RENDER instead of /VIEW so that the sketch displays in the studio and not interrupt your game. The rendered sketch will be at the studio waiting for you.
 
Saving a sketch
  1. You must be in the Studio to save a sketch.
  2. While the sketch is still on the drawing board, or if this is your own sketch and you are finished for the session, click on the SAVE button.
  3. The text "/FILE SAVE" will automatically appear on the text input box. Leave a space and enter any one-word title you would like to name the sketch. Press ENTER.
  4. The file will now show on the "Saved Sketches" window.

The files are saved on the particular computer you are using, and not on the iSketch server. Don't worry if you are only partially finished with your draw. You can load it again later and update it!


Sending a sketch
  1. Select the file (it will turn bold when selected).
  2. Click on LOAD.
  3. Type /SEND username.


Studio Features

The studio has unique commands, tools and buttons that will allow you to work with its many features:

Command/shortcut
Button/Tool
Purpose
/FILE LOAD file
Brings up a selected sketch file for editing or sending. If typing the command instead of using the button, you can enter either the filename or the filenumber for "file".
/VIEW
Displays a selected file, or displays a sketch that has been sent to you.
/FILE SAVE file
Saves the sketch currently on the board, or a file that has been sent to you.
/FILE DELETE file
Deletes the selected file permanently from your computer.
/FILE RENAME file# newname   Gives the file a new name.
/FILE DIR
Displays the directory of your saved sketches, as shown on the top left window.
/COPY
Copies the displayed sketch to your clipboard.
/SEND or /SHARE username
Transfers your sketch to a user/s. The recipients type /RECEIVE to initiate the transfer from your computer to their computer. They can then add to the sketch and/or save it.
/SHOW username
Shows your sketch to a user. The recipient can't save the sketch; they can only view it.
/SENDFULL
Sends a selected Studio image in its entirety without rendering it in stages. A big amount of data will be sent at once.
/STOP   Stops and resets an ongoing file transfer.
/SYM number
Activates the cyclic symmetry mode for use with the pen, brush or eraser. Use any number up to 50; default setting is at 6. Using the symmetry mode will generate 6 equidistant/equivalent strokes.
/MIRROR number
Switches to mirror type symmetry. Each stroke will now be mirrored. Type again to toggle back to cyclic symmetry.
/SYM 0
Turns off symmetry mode altogether.
Alt + zoom tool
Changes the current tool to an eyedropper.


Creating with the Symmetry Tool


This is an illustration of a question mark
in normal drawing mode.


Activate the symmetry mode by clicking on the top left portion of the symmetry palette (shown on the left). Draw the same single question mark as you did above. Six different equidistant question marks will show up on the board, creating a cyclic symmetry sample.

The default setting is 6, but you can select how many equal forms show up at the same time, up to 50. Simply click on the arrows to the left or right of the number.

Shortcut: /SYM number


Clicking on the box on the upper right of the symmetry palette activates mirror symmetry. A mirror image of each of the 6 question marks is created to result in an elaborate pattern. Remember, the picture on the left was made by drawing only 1 question mark. Imagine what you can do with a few more strokes!

Shortcut: /MIRROR number